Server Setup Guide
This document explains how to setup the server environment on Ubuntu Linux to host and run coreERP. These are external dependencies that are required for coreERP to function as a web application. The steps mentioned have been tested against Ubuntu Server 16.04 LTS. You are required to connect to the server via a ssh and should have root/sudo privileges on the server.
Each step explains the commands required to be executed on the shell. Ensure that there are no errors reported on execution of a command. After installation of a required dependency, a few simple tests are also listed. Running these tests ensures that the required program/dependency has been installed and configured properly.
All commands are to be executed on the ssh terminal opened to the server. On your local node, you would only need a browser like IE9, Mozilla Firefox or Google Chrome. Ubuntu Server is very easy to install or you could use an Amazon or Google image on the cloud to create a virtual instance. These cloud service providers also provide free tier’s to create micro instances at zero costs. You may also install a stand alone Ubuntu server or desktop and configure it.
While connecting to the ssh terminal on the server, ensure that you have sudo privileges.
Execute the following command to update apt-get repositories
$ sudo apt-get update
Note
This downloads the latest apt-get repos and updates the libraries and dependencies.
Setting the Timezone
If your server is locally hosted and you have the properly configured the timezone during installation, you can skip this step.
To set the proper timezone, we will first find the timezone
$ date
this would give us the current time on the server.
$ more /etc/timezone
this would display the current time zone.
Execute this command to set the time zone
$ sudo dpkg-reconfigure tzdata
Follow the instructions on the screen. It is easy to configure.
Install postgreSQL
Our first installation would be PostgreSQL database server. This is an RDBMS database that is available in the ubuntu repository. If you want to install the latest version, then it can be downloaded from postgresql website. We will install from ubuntu repo.
$ sudo apt-get install postgresql-9.5 postgresql-contrib-9.5
this would install postgreSQL server and its client tools.
Let us now configure PostgreSQL server for authentication, timezone, etc.
$ cd /etc/postgresql/9.5/main
the postgres directory where it is installed by default. If you have installed it elsewhere, then move to that specific directory. 9.5 is the version number. If you have installed any other version, then change the path based on version number.
Optional Step: Set postgreSQL to listen on all ip(s). If you want to connect to postgres from your node, do the following step. You may also skip this step and proceed to authentication method.
$ sudo nano postgresql.conf
Search for the following:
**CONNECTIONS AND AUTHENTICATION**
#listen_address='*'
Recommended Steps: Modify PostgreSQL settings based on server capacity. You may read the Postgres documentation to get a better understanding of the following parameters. Here again we edit postgresql.conf
# **CONNECTIONS AND AUTHENTICATION**
max_connections = 50    #Ensure that this is a reasonable number. Else you will start getting connection errors

# **RESOURCE USAGE**
# - Memory -
shared_buffers = 512MB    #TOTAL_RAM/8 subject to a max of 512MB is recommended

work_mem = 32MB  #This is derived by (TOTAL_RAM_FOR_POSTGRES/max_connections)/2. Averaging 2 sorts per connection.
The aforementioned settings are ideal for a machine with 4GB RAM with 80% utilisation reserved for Postgres.
# **AUTOVACUUM PARAMETERS**
autovacuum = on   #Enable Autovacuum process

#------------------------------------------------------------------------------
# CLIENT CONNECTION DEFAULTS
#------------------------------------------------------------------------------
temp_tablespaces = 'db_temp'        # For Temp Table Spaces (optional)

timezone = 'UTC'   # This will ensure that the Universal timezone is used by postgreSQL.
Save and close file changes (ctrl+o, Enter, ctrl+x)
Set postgres authentication method
$ sudo nano pg_hba.conf
Search for the following lines
Enable *Database administrative login for unix socket* as follows
local     all     postgres        peer
Change from ‘peer’ to trust. Save and close file changes (ctrl+o, Enter, ctrl+x)
$ sudo service postgresql restart
this would restart the service.
Warning
You have now opened postgres login to allow access to database without password from local machine. We will fix this in a moment.
Login into psql client and set the user postgres password
$ psql -U postgres
=#: \password postgres
it will prompt you for new postgres password. Set this and also remember it
=#: \q
will exit to shell.
Change the database login from trust to md5. This will ensure that users can login only with a password. Trusted connections are no longer allowed.
$ sudo nano pg_hba.conf
again edit the hba_conf file. Search for the following:
Enable *Database administrative login for unix socket* as follows
local     all     postgres        trust

# "local" is for Unix domain socket connections only
local   all             all       peer
change this from trust and peer to md5. Please make changes to both the lines. Your new changes will appear as follows
Enable *Database administrative login for unix socket* as follows
local     all     postgres        md5

# "local" is for Unix domain socket connections only
local   all             all       md5
Save and close file changes (ctrl+o, Enter, ctrl+x).
$ sudo service postgresql restart
will restart postgreSQL.
Note
we have now ensured that user postgres can login only with a password and the timezone is server timezone.
Optional Step:New tablespace db_temp
Do this step only if you have uncommented temp_tablespaces in the previous step. We first create a directory and provide postgres permissions
$ sudo mkdir /pgtemp      ##This can be any path for temp with enough disk space. Ensure that this is a fast disk.
$ sudo chmod postgres:postgres /pgtemp
Login to psql and create tablespace
$ psql -U postgres -W
Enter the password that you had previously set.
=#: CREATE TABLESPACE db_temp OWNER postgres LOCATION '/pgtemp';
=#: \q
| Tests: | We will now ensure that postgreSQL is working properly $ psql -U postgres -W
enter the password that you had previously set. =#: Select * From information_schema.tables;
this should output the table list .: =#: \q
will exit to shell. |
|---|
Install apache2
coreERP can be hosted on apache or nginex. In the present setup, we will host it on apache. Again, apache is available as a package from ubuntu repository.
$ sudo apt-get install apache2
After installing apache, we will do a few settings to secure the sites that we would publish. This is done by editing apache2.conf
$ cd /etc/apache2/
$ sudo nano apache2.conf
Look for the following:
<Directory /var/www/>
    Options Indexes FollowSymLinks
    AllowOverride None
    Require all granted
</Directory>
Remove Indexes from Options. This would ensure that apache does not allow file/directory listing. Your new directive should appear as follows
<Directory /var/www/>
    Options FollowSymLinks
    AllowOverride None
    Require all granted
</Directory>
Again look for the following:
<FilesMatch "^\.ht">
    Require all denied
</FilesMatch>
This ensures that .htaccess is not rendered to the client.
Save the changes and close the file. Restart apache
$ sudo service apache2 restart
| Tests: | To ensure that apache is working properly, run the following tests $ wget http://localhost
this would download the index.html of apache welcome page. |
|---|
You can also open a browser on your local node and type the public ip of the remote server. It should display the apache welcome page. This would happen only if port 80 is open in the firewalls to the server.
Install php 7.0
coreERP is built on php. The latest version of php is available in the ubuntu repo as php7.0.
$ sudo apt-get install php7.0 php7.0-mcrypt php7.0-pgsql php7.0-mbstring php7.0-xml
$ sudo service apache2 restart
For Ubuntu 16.04 also install
$ sudo apt-get install libapache2-mod-php7.0
| Tests: | To ensure that php with apache is working properly, we will generate phpinfo from apache $ cd /var/www/html
$ sudo nano index.php
|
|---|
Insert the following lines and save (ctrl+o), Enter, exit(ctrl+x)
<?php
echo phpinfo();
From your node, open browser and type http://<remote-ip>/index.php and verify the following
- mcrypt is enabled
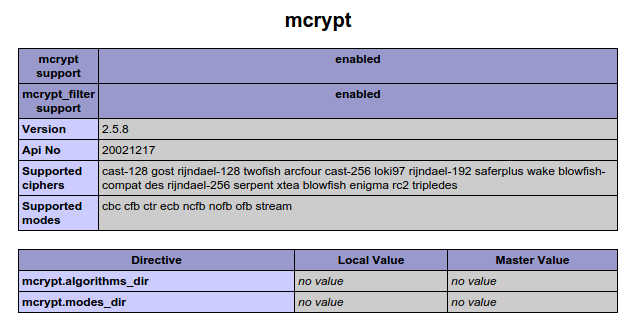
- PDO and pgsql is enabled

Similarly check for mbstring and SimpleXML.
Install java 1.8
Java is used to render reports designed in Pentaho with
$ sudo apt-get install openjdk-8-jdk
| Tests: | run the command
|
|---|
Install fonts
Reports are directly dependent on some fonts. These fonts are required to be installed on the server.
$ sudo apt-get install ttf-liberation
Warning
If these required fonts are not installed properly, the reports would fail to render.
Install tomcat
Tomcat is the JRE container used by Pentaho reports.
$ cd /opt
$ sudo wget http://storage.googleapis.com/server-setup/tomcat-setup.tar.gz
This is uploaded on google storage. It has pentaho report libraries preconfigured for use in tomcat.
$ sudo tar xzvf tomcat-setup.tar.gz
$ cd /opt/tomcat/bin
$ sudo ./startup.sh
| Tests: | Open browser from local node and type the following address http://<remote-ip>:8080.
It should display tomcat welcome page. |
|---|
This completes the installation of all dependencies of coreERP on the server. Continue with Install and Configure Guide.